 Flippd Help
How do I track bulk purchases and liquidation lots?
Bulk Purchases helps you track liquidation pallets, wholesale lots, mystery boxes, and other multi-item buys. Link your inventory items to a purchase, allocate the cost across them, and see your total investment, profit, and ROI for the entire lot.
What Are Bulk Purchases?
When you buy a group of items together -- a pallet, lot, bundle, mystery box, or storage unit -- you pay one price for the whole thing. A bulk purchase is the parent record for that buy, and the individual items you add become its linked items.
This parent-to-items model lets you:
- Record the total cost, shipping, and supplier in one place
- Link individual inventory items to the purchase
- Spread (allocate) the cost across those items so each one has an accurate cost of goods
- See combined financials -- cost, revenue, profit, ROI, and recovery -- for the whole lot
Every linked item shows a PART OF BULK PURCHASE banner in its detail view, along with the cost allocated to it. Tap the banner to jump straight back to the parent purchase.
Where to Find It
Go to Tools > Bulk purchases (top of the Tools screen).
If you don't see the tile, it's been switched off under Settings > Feature Visibility > Sourcing > Bulk Purchases. It's on by default.
Creating a Bulk Purchase
Tap Add Bulk Purchase and pick how you want to start:
- Add New -- Create a bulk purchase manually.
- Scan & Create -- Create the purchase, then scan barcodes to add items right away.
- Add Photo & Create -- Create the purchase and attach a receipt photo at the same time.
Then fill in the details:
- Name -- A description of the lot (e.g., "Amazon Returns Pallet #42")
- Cost -- Total purchase price
- Shipping Cost -- Delivery and freight charges
- Supplier -- Who you bought it from
- Purchase Type -- Pallet, lot, bundle, mystery box, storage unit, or other
- Source -- Where you bought it (e.g., Liquidation.com, B-Stock, BULQ, local auction)
- Storage Location -- Where the lot lives (optional)
- Manifest Value -- The claimed retail value of the lot (optional)
- Status -- Defaults to Ordered
- Dates -- Purchased, Shipped, and Received
- Notes
Tap Save when you're done.
Adding Items to a Purchase
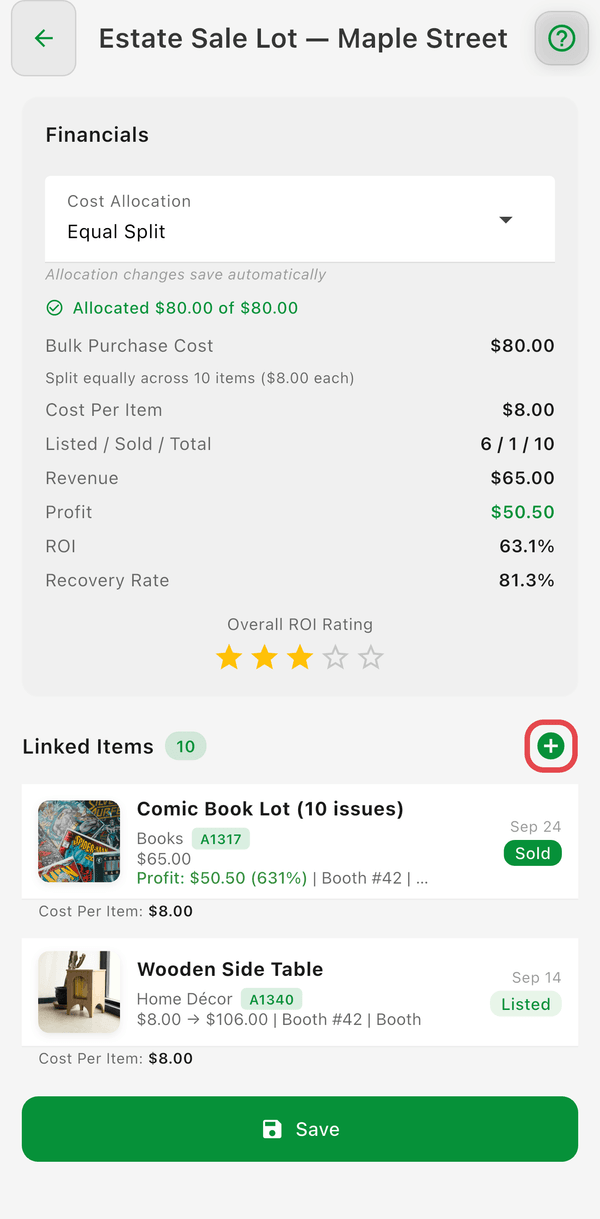
Open a purchase and tap Add Items -- either the green + next to the Linked Items heading, or the Add Items button in the empty state.
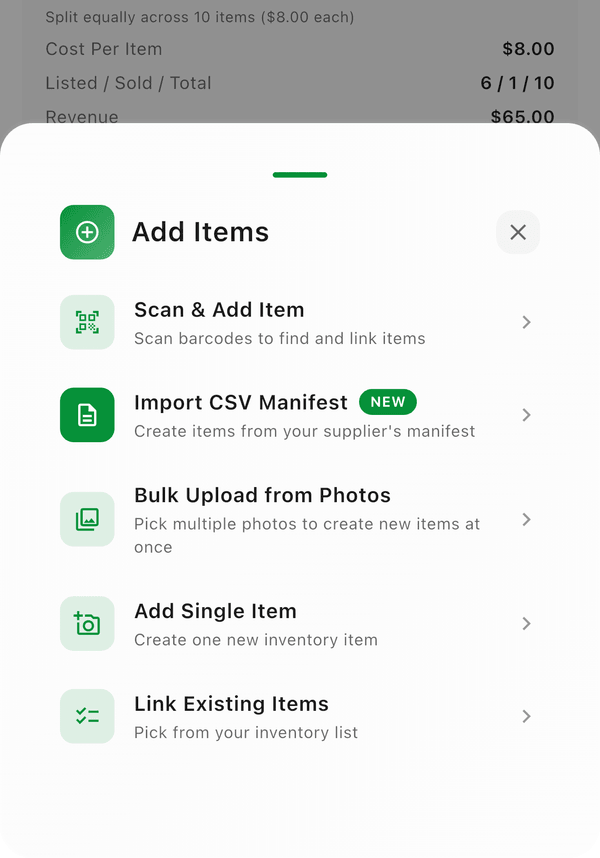
You have five ways to add them:
- Scan & Add Item -- Scan barcodes to find and link items. The scanner stays open and loops, so you can work through a pallet barcode after barcode without reopening it each time. Product details are looked up automatically where available. (Mobile app only.)
- Import CSV Manifest -- Upload the CSV your supplier sent with the lot and turn its rows into items in one pass (see below).
- Bulk Upload from Photos -- Pick up to 20 photos at once and create a new item from each, all linked to this purchase. You can optionally have titles written for you and set a default source and category for the batch.
- Add Single Item -- Create one new inventory item on the normal add form, already attached to this purchase.
- Link Existing Items -- Pick from items already in your inventory.
Fastest way to work a pallet: use Scan & Add Item and stay in the scan loop, or Bulk Upload from Photos to create a whole batch in one pass. Both create the items and link them in a single step.
Importing a supplier manifest (CSV)
Most liquidators send a manifest -- a spreadsheet listing what's in the lot. Import CSV Manifest reads that file and creates one inventory item per unit, already linked to the purchase:
- Upload -- Choose the CSV (up to 5,000 rows). Tap Download sample CSV if you want to see the layout we expect.
- Map -- We auto-match your columns to Item name (required), Value / MSRP, Quantity, and Condition. Check the guesses and change any that are wrong; extra columns are ignored.
- Review -- Untick any rows you don't want. Rows with a quantity expand into individual items ("Echo Dot (1 of 3)", "(2 of 3)", …) so each one can be listed and tracked on its own. Tap Add N Items to This Lot.
Each item is created as Unlisted with the manifest value as its list price and the condition noted on it. When your manifest has values, the purchase's cost allocation switches to Weighted by List Price so higher-value units carry more of the cost (a purchase already set to Manual keeps its manual costs). The free plan's 20-item cap applies to the whole import.
Linking items you've already added
Link Existing Items opens a searchable picker of your inventory. Search by title, stock number, SKU, or barcode, or tap the scan icon to look one up by barcode. Tick as many as you like and tap Save. The picker loads your 500 most recent items, so use search for anything older.
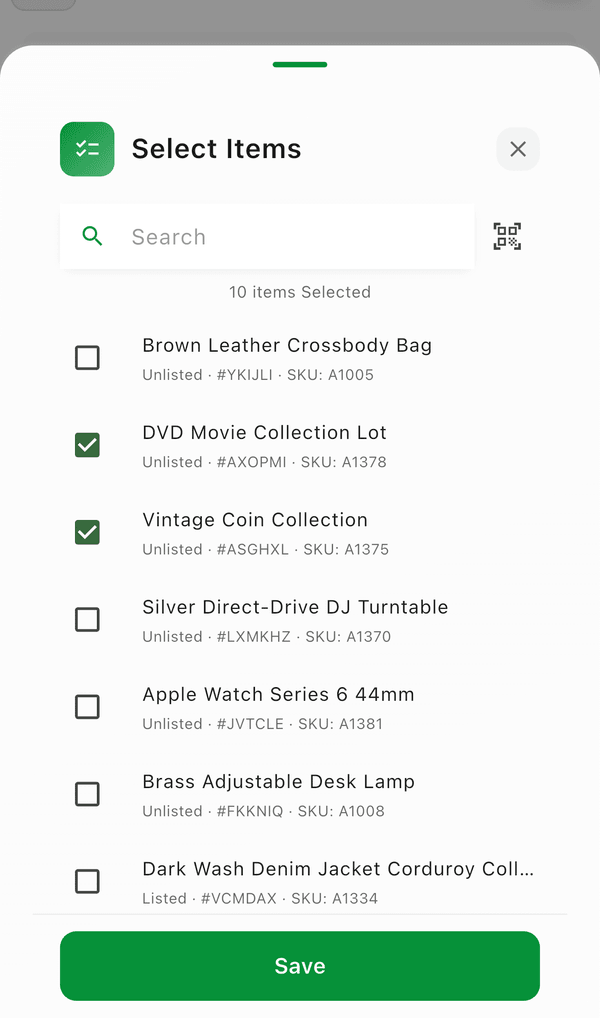
An item can belong to only one bulk purchase at a time. If an item is already linked to another purchase, it shows Linked to another bulk purchase in the picker and can't be selected until you unlink it.
Can I link an item from the item's own screen?
Not right now. Linking only works from the purchase inward -- open the bulk purchase and use Add Items. There is no "bulk purchase" picker on the add or edit inventory form, and bulk purchase isn't one of the fields you can set through the inventory list's bulk edit (that covers Category, Source, Storage Location, and Listing Platforms).
If you're adding items as you unpack a lot, start from the purchase rather than from Inventory -- Scan & Add Item and Bulk Upload from Photos both create brand-new items without leaving the purchase, so you don't need to add them in Inventory first and link them afterwards.
Allocating Costs
Cost allocation spreads the lot's total cost across its items so each one has an accurate cost of goods. The allocated amount is written to each item's Cost of Goods field, so it flows through to that item's profit, your reports, and your taxes automatically.
Choose a method under Cost Allocation:
- Equal Split -- The total cost is divided evenly across the items. The per-item amounts always add back up to the total exactly, with no lost cents.
- Weighted by List Price -- The cost is split in proportion to each item's list price, so higher-priced items carry more of the cost. If your items aren't priced yet, it automatically splits equally instead ("No list prices yet -- splitting equally").
- Manual -- You set each item's cost yourself. A banner tracks your progress and shows "Allocated $X of $Y", along with how much is left or over. Tap Balance remainder to spread the leftover difference across the items automatically.
Pinning an item's cost
When you edit a single item's cost directly, that item becomes pinned ("Pinned -- recompute won't change this"). Pinned items keep their exact value, and the rest of the pool absorbs the remainder when costs recalculate. Tap Reset on the item to unpin it and let it rejoin the automatic split.
Allocation controls save automatically. Unlike the purchase metadata (which uses the Save button), changing the allocation method, balancing the remainder, or pinning a cost is saved for you instantly.
Costs re-split every time the lot changes -- when you add or remove items, or edit the cost or shipping. Add ten more items to a pallet and every item's share drops accordingly, except any you've pinned.
The Financials Card
The purchase detail screen shows combined financials for all linked items, and they update live as items are listed and sold:
- Total Cost -- Purchase price plus shipping
- Cost Per Item -- Total cost divided by the number of items. This shows only on Equal Split; on Weighted or Manual it displays a dash, because items no longer share one flat cost
- Listed / Sold / Total -- Your progress through the lot
- Revenue -- Total sales from linked items
- Profit -- Revenue minus total cost
- ROI -- Return on investment percentage
- Recovery Rate -- How much of your investment you've recovered so far
- Recovery vs. Manifest -- Your revenue against the lot's claimed retail value (shown only when you've entered a Manifest Value)
- Overall ROI Rating -- A star display that gives you a quick visual read on how the lot is performing
Purchase Status
Track where each purchase is in your workflow:
- Ordered -- Purchase placed, waiting for shipment
- Shipped -- In transit
- Received -- Delivered, ready to process
- Processing -- Sorting, listing, and photographing items
- Complete -- Everything's done
When every linked item has sold, Flippd shows an inline nudge ("All items have sold.") with a Mark complete action so you can close out the lot in one tap.
Receipts and Proof of Purchase
Attach a receipt to keep your proof of purchase with the lot. You can scan a new receipt, upload one from your photos, or link an existing receipt already in Flippd. The receipt stays attached to the bulk purchase.
Tapping an attached receipt on the bulk purchase screen doesn't open it yet. To view the receipt, find it in Tools > Proof of purchase.
Deleting a Bulk Purchase
Deleting a purchase does not delete your inventory. The items stay in your inventory and are simply unlinked.
Because the cost was allocated by the purchase, unlinking clears each item's Cost of Goods -- it isn't restored to an earlier value, since the lot cost was the source of it. If you delete a purchase and want those items to keep a cost, set it on each item afterwards.
Good to Know
- Each inventory item can be linked to only one bulk purchase at a time
- Linking works from the purchase inward -- there's no bulk purchase picker on the item form or in bulk edit
- Unlinking an item from a purchase does not delete the item, but it does clear the cost that was allocated to it
- You can add items at any time -- you don't have to add them all at once
- Creating brand-new items from a purchase counts toward your inventory limit on the free plan, same as adding them anywhere else
- Metadata fields (name, cost, supplier, dates, notes) save with the Save button; allocation controls save automatically
- Weighted by List Price falls back to an equal split until your items have list prices
- The ROI star rating is a quick visual indicator of how the lot is performing