 Flippd Help
How do I create and print labels for my items?
To create labels, go to Tools > Labels, select the items you want to label, pick a template, and print or save as PDF. Labels work the same on the web and in the mobile app.
Step-by-Step
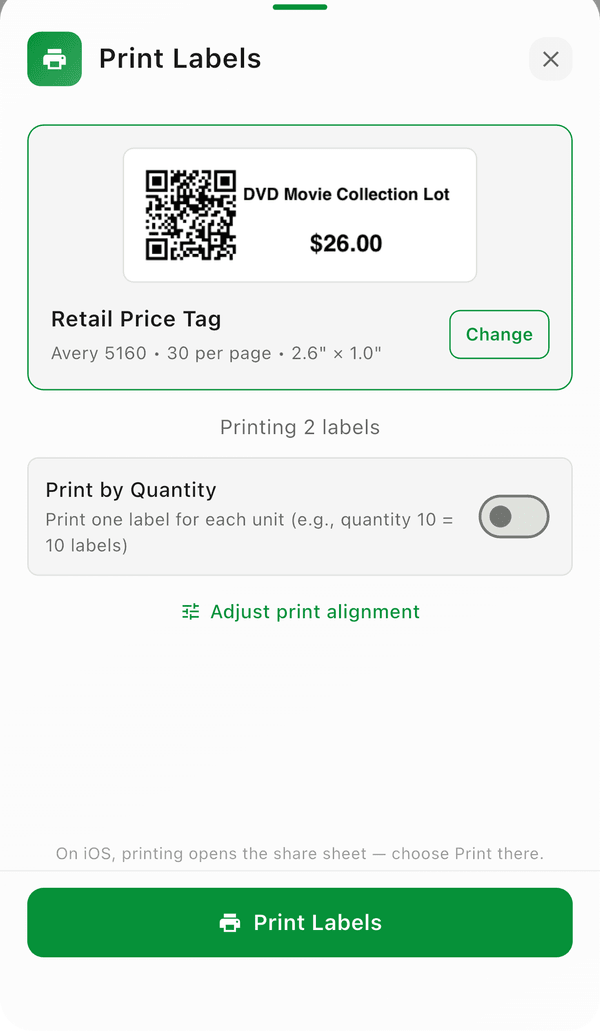
- Go to Tools > Labels
- Select items by tapping them anywhere on the row (or tap Select All) -- selected items stay pinned in a Selected for Print section at the top
- Tap Print Labels
- In the print sheet, check the preview -- it's rendered with your first selected item through the real print pipeline, so what you see is what prints
- Tap Change to pick a different template, or Print Labels to send it to your printer
The system print dialog is where you choose your printer or Save as PDF. Share as Image is also available if you'd rather send the sheet somewhere else -- it only appears in the print sheet when Settings > Feature Visibility > Share Labels as Image is on.
To print a label for a single item, open the item and choose Print Label from the ⋮ menu in the bottom bar.
What Can Go on a Label
Labels are built from elements you place on a template -- there's no fixed list of checkboxes. Available elements:
- Title -- the item's title
- Price -- list price, sale price, or cost
- Static Text -- any fixed text you type (booth number, store name, "All Sales Final")
- Stock Number
- SKU
- Identifier -- a fixed code you type once that prints on every label using that template
- Category
- Storage Location
- QR Code -- scans back to the item in Flippd
- Logo -- your business logo
- Date Acquired, Date Listed, Date Sold
Add, move, resize and style these in the label editor -- see How do I customize my label templates?.
Printing a Booth or Vendor Number on Every Label
If your mall or shop requires a booth number on every tag, use the Identifier element -- you type the number once and it prints on every label made from that template.
- Go to Tools > Labels and tap the Manage Templates icon in the top right
- Open the template you want (tap ⋮ > Edit, or New Template to start fresh). Editing a system template makes your own copy first, so the original stays intact
- Tap +, then choose Identifier under Inventory
- Tap the Identifier element on the label to select it, then type your booth number in the Identifier box that appears below the canvas
- Drag it where you want it, then tap Save
Every label printed from that template now carries your booth number. Static Text works the same way if you'd rather type free-form text like Booth 123 -- Main Aisle.
The Identifier value is stored with the template, so if you print from more than one template, set it in each one. If you run several booths with the same number, one template covers them all.
Searching for Items
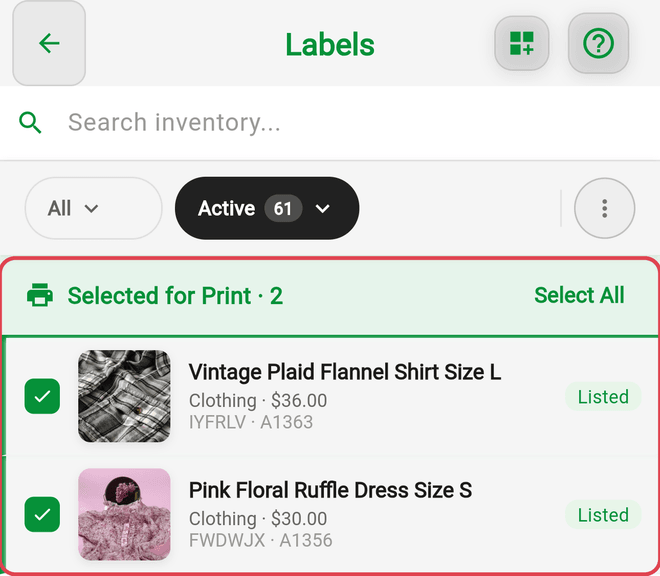
The search bar on the Labels screen works exactly like the main inventory search -- it isn't limited to stock number or title. You can search by anything you'd search on the Inventory screen, including the item's description, and combine it with the filters (e.g., Unprinted) to quickly find items that still need tags. Handy when a tag is lost or damaged and you need a quick reprint. Each row shows the item's title and description, so similar items are easy to tell apart.
Build a batch across multiple searches. Your selections stay pinned in the Selected for Print section while you keep searching -- find an item, tap it, then search for the next one, and the batch keeps growing until you're ready to print. Switching filters (for example between Printed and Unprinted) keeps your selections too, so you can mix reprints of lost tags with brand-new labels in one print run. Select All adds the current results to your selection without replacing what you've already picked.
Label Formats
Flippd's built-in label formats are:
- Avery sheets -- Avery 5160, Avery 8167, Avery 5163, Avery 5164, and Standard 2x7
- Thermal labels -- Thermal 2x3, 3x2, 4x6, and 4x2
- Small thermal labels -- Thermal 30x40mm, Thermal 40x30mm, and Polono 220M (50x30mm)
- Custom size -- Set your own dimensions in the format picker
Batch Printing
Print labels for many items at once:
- Use filters to find items (e.g., all Unlisted items)
- Tap Select All or choose specific items
- Generate and print up to 100 labels at a time
Turn on Print by Quantity in the print sheet to print one label per unit -- an item with a quantity of 10 produces 10 labels.
Tracking Print Status
Items show Printed or Unprinted status so you can:
- Filter to see only unprinted items
- Avoid printing duplicate labels
Printer Tips
- Thermal printers are best for high-volume label printing
- Regular inkjet/laser printers work well for occasional use
- Test alignment with one label before printing a full batch
- Use Adjust print alignment in the print sheet if labels aren't lining up
Adding Your Business Logo
You can print your own business logo on labels:
- Upload your logo in Settings > Business Profile (PNG or JPEG, under 5 MB)
- In the label editor, add a Logo element to your template and position it
- Save the template -- your logo now prints on labels that use it
The logo is opt-in, so it only appears on labels where you've added the Logo element.
Good to Know
- Label templates are synced to your account and available on all devices, web included
- There is no barcode element -- the QR code is the scannable code on Flippd labels, and it opens the item in Flippd. The barcode field on an item (UPC/EAN/ISBN) is for looking items up, not for printing
- The Custom Field element can't be pointed at a specific custom field yet, so it prints blank. Use Static Text for fixed wording, or Identifier for a booth or vendor code
- Custom field values do print in exports and show on the item screen
- There's no option to start partway through a sheet or skip labels that are already used -- labels always fill from the top-left of the sheet, left to right and row by row, in the order printed