 Flippd Help
How do I add and track business expenses?
To add an expense, open Expenses, tap +, choose Enter manually, fill in the details, and save. Tracking expenses helps you know your true profit and prepare for tax season.
Step-by-Step
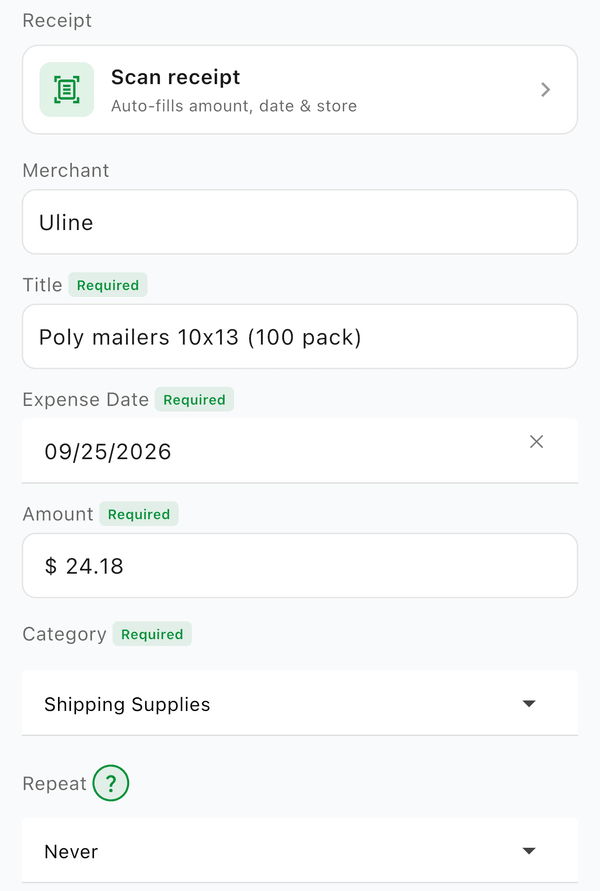
- Open Expenses -- on a phone, tap Tools, then Expenses; on web and desktop (and other wide screens), choose Expenses in the sidebar
- Tap +, then Enter manually (or Scan with camera / Scan from gallery to let a receipt fill in the form for you)
- Enter the expense details:
- Title -- What you bought (e.g., "Shipping supplies")
- Amount -- How much you spent
- Category -- Type of expense (Shipping Supplies, Platform Fees, etc.)
- Date -- When you made the purchase
- Tap Add Receipt to attach a photo of your receipt (optional but recommended)
- Tap Save
Why Track Expenses?
As a reseller, your business expenses are tax-deductible. Tracking them helps you:
- Reduce your taxable income at tax time
- Know your true profit after all costs
- Be prepared for tax season with organized records
- Make smarter business decisions about spending
Finding an Expense
To find a specific expense, use the search bar at the top of the Expenses screen. Search matches the start of any word in the expense title, category, notes, or tags -- typing "Ma" or "May" both find "Storage Unit Rent May 2025". Search one word at a time; a two-word phrase won't match.
You can also narrow the list with the filters: Type, Min / Max amount, Has Receipt, Linked, Recurring, and Tag. The year filter in the header controls which year you're looking at -- if an expense you just saved seems to be missing, check that the header year matches its date.
Good to Know
- You can edit or delete expenses anytime
- Expenses are included in your profit calculations and reports
- The IRS recommends keeping receipts for at least 3 years -- Flippd stores them in the cloud
- Turn on Link Expenses to Inventory under Settings > Inventory Preferences > Features to link an expense to the item it was for. Then link from either side: the Linked Inventory Items row on the expense's detail screen, or the Linked Expenses row on the item's detail screen -- see How do I customize how my inventory list looks?
- The free plan caps how many expenses you can add; subscribers have no cap -- see What are the usage limits on the free plan?