 Flippd Help
How do I use Flippd for my antique booth?
Set up your booth as a parent Storage Location with shelves and cases as sublocations, add your mall as a custom selling platform, and publish a Storefront so shoppers can browse the booth from a QR code. Flippd then knows exactly what's in the booth, what it's worth, and what sold when the mall's monthly sheet arrives.
Set Up Your Booth
- Add the booth as a parent Storage Location. Go to Tools > Storage locations and create one for the venue (for example "Brass Armadillo Booth 42"). If you rent in more than one mall, create a parent per booth.
- Add shelves and cases as sublocations. Create "Shelf A", "Locked Case", "Back Wall", and so on, with the booth as their Parent Location. Print a QR code for each and stick it where it belongs.
- Add the mall as a selling platform. Go to Settings > Customize Data > Platforms and add a platform such as "Antique Mall" with the mall's commission as its fee. Recording booth sales against it keeps booth profit separate from your online sales. If the mall takes no commission, the built-in Booth / Market platform (0% fee) already does the job.
- Log rent as a recurring expense. Go to Expenses and set up your monthly booth rent so it lands in your expense totals and tax reports automatically.
- Publish a Storefront. Open Storefronts, pick the antique booth venue type, and map your booth's storage locations to shopper-friendly section names. Print the QR code and put it on the booth. Shoppers browse what's Listed without needing the app.
Stocking the Booth
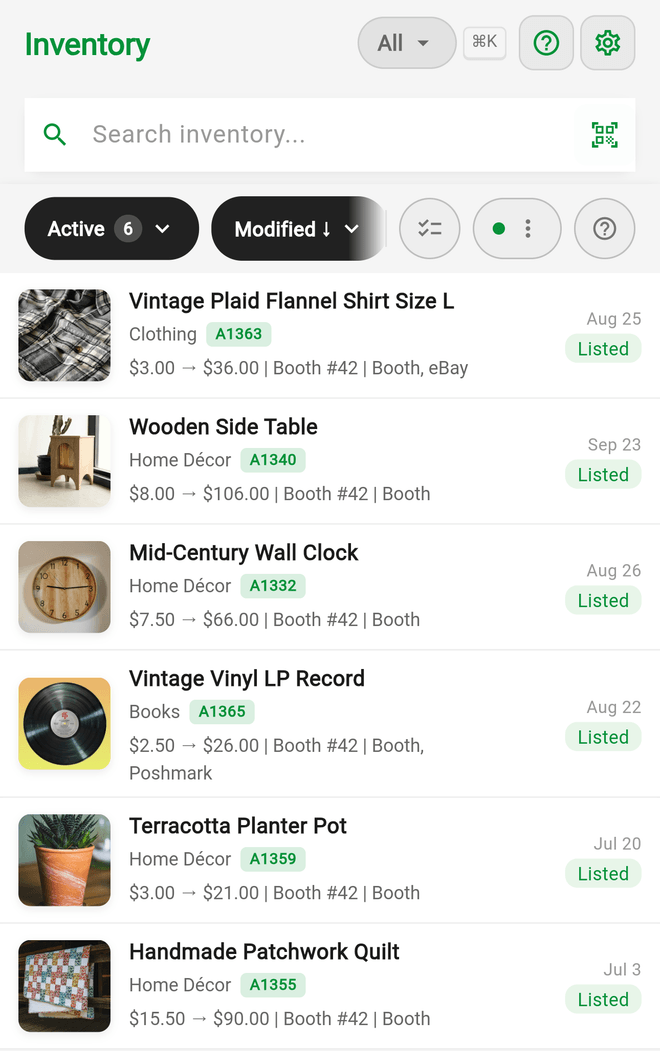
When you move an item into the booth, set its Storage Location to the shelf or case it sits on, and set its status to Listed so it appears in the Storefront. Moving a carload? Use bulk edit to assign the location to a whole batch at once. The Source stays whatever it was, such as the auction or estate sale where you bought it.
Printing price tags? Add the Identifier element to your label template so your vendor code prints on every tag.
Filter Inventory by the booth's parent location to see everything in the booth at once. The Storage locations screen shows each location's item count and value, sublocations included.
Monthly Reconciliation
Malls typically hand you a monthly sales sheet:
- For each sold item, record the sale against your mall platform with the actual price. Sold items stay visible in your Storefront with a Sold marker unless you turn off Show sold items in the storefront's details.
- Filter by the booth location and compare what should be there against what is. That's your restock and shrinkage check.
- Open Reports and use the Platform Performance chart to compare your mall platform against your other channels.
Features You Can Skip
- eBay sync only matters if you also list online. If you do, connect it (a Pro feature) and keep booth stock and eBay stock separate: items linked to eBay never appear in your Storefront, so an item that's on eBay won't show to booth shoppers.
- Invoices are rarely needed since the mall handles checkout.
Good to Know
- Tools > Aging shows what's been listed longer than your pace (booth sellers default to 180 days; change it under your Coach's Your pace settings). Rotate stale items out and try them online instead.
- QR codes on shelves let you scan and instantly see what belongs there.
- Items can only be in one place: if something is listed online and sitting in the booth, keep its location current.
- Mileage to restock or reconcile the booth is deductible. Turn on Automatic trip tracking under Tools > Mileage to detect those drives.
- Renting with a partner? Invite them under Settings > Users so you both work in the same inventory. Inviting requires Pro; your partner joins on your subscription.
Related Articles
- How do I set up and use storage locations?
- What are Storefronts and how do I use them?
- How do I customize my selling platforms, categories, and sources?
- How do I set up recurring expenses for subscriptions and rent?
- How do I use the Inventory Aging report to find slow-moving items?
- How do I use QR codes to find items and scan storage locations?