 Flippd Help
Quick start guide: Your first week with Flippd
New to Flippd? This checklist walks you through the essentials to get your reselling business tracked and organized in your first week. The Set up your coach checklist on your Home screen is the in-app version of this list.
Day 1: Set Up Your Account
- [ ] Sign in with Apple, Google, or email
- [ ] Set your business country and currency -- Go to Settings > Business Profile > Business Country (this affects fee calculations and reports)
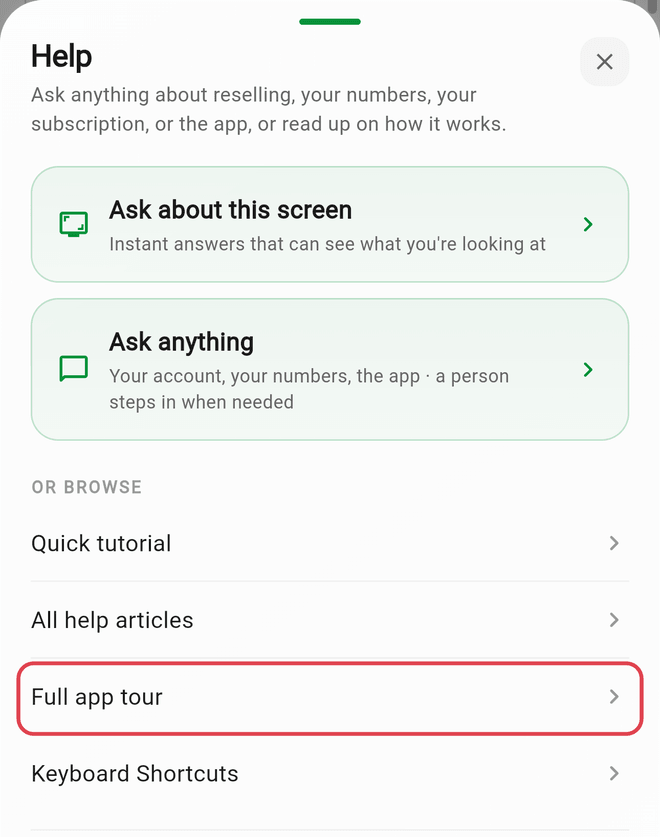
- [ ] Take the full app tour -- Tap the ? Help icon in the header, then Full app tour, to get a guided walkthrough of every screen
- [ ] Customize your platforms -- Go to Settings > Customize Data > Platforms and add the ones you sell on (eBay, Poshmark, Mercari, etc.)
Day 2: Add Your First Items
- [ ] Add 5-10 items to get familiar with the process -- tap the green Add button in the middle of the bottom bar
- [ ] Fill in the basics for each: Title, Cost of Good, Category, and a Photo
- [ ] Try AI image recognition -- Add a photo and let Flippd suggest a title and category
- [ ] Set up storage locations if you organize items physically (Shelf A, Closet 1, Tote 3, etc.)

Day 3: List and Sell
- [ ] Mark items as Listed when you post them on a selling platform
- [ ] Record your first sale -- When something sells, tap Mark as Sold and enter the sale details
- [ ] Check your profit -- Flippd automatically calculates your profit after each sale
Day 4: Explore Reports
- [ ] View your Daily report -- Go to Reports to see today's sales and profit
- [ ] Check the Monthly tab -- See your month-to-date performance
- [ ] Tap a platform or category name in reports to drill down into the filtered inventory view
Day 5: Track Expenses
- [ ] Add a business expense -- Go to Tools > Expenses and log any business costs (shipping supplies, sourcing trips, subscriptions)
- [ ] Scan a receipt if you have one -- Flippd's AI extracts the amount and date
- [ ] Set up a recurring expense for any monthly costs (storage unit rent, platform subscriptions)
Day 6: Set Goals
- [ ] Browse challenges -- Go to Goals and see what Flippd recommends under Suggested for you based on your activity
- [ ] Tap Accept Challenge on a suggestion, or tap Add Goal to write your own custom goal with a target date
- [ ] Check your progress -- Challenges track automatically as you list and sell items; custom goals are self-managed, so tap Mark Complete when you've done it
Day 7: Get Organized
- [ ] Import existing inventory if you have a spreadsheet -- Use the CSV import feature. eBay sellers can sync instead: go to Settings > Integrations
- [ ] Print labels for your items with QR codes for easy lookup
- [ ] Set up mileage tracking if you drive for sourcing trips
- [ ] Explore the Profit Calculator -- Run the numbers on a potential purchase before you buy
Beyond the First Week
Once you're up and running:
- Use bulk upload after sourcing trips to add multiple items from photos at once
- Check sell-through rate to understand how fast your inventory moves
- Review the Death Pile regularly to identify items that need price drops or relisting
- Compare years once you have enough data to track your growth
- Share your wins on social media with the share feature
Good to Know
- You don't have to do everything at once -- start with adding items and recording sales, then layer in other features
- The in-app tour is available on every screen -- tap the ? Help icon in the header, then Quick tutorial
- On the Reports screen, pull down to refresh data if numbers look stale
- Your data syncs across iOS, Android, and web automatically
- The free plan includes up to 20 inventory items, 25 expenses per month, and 30 mileage trips per month -- see What are the usage limits on the free plan?